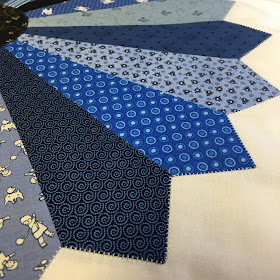
I nearly titled this post, "The Dresden Files" but figured that was too nerdy, ha ha! Since returning home from retreat I continued on with the Dresden Plate blocks. These are insanely fun to create. Sewing all the points, snipping corners and turning them out, pressing then sewing again.
The mini ironing board was invaluable and the little Steamfast iron cannot come more highly recommended! I must remember how handy this set-up is the next time I have blocks requiring a lot of pressing in between sewing. It was so nice to just turn and press instead of gathering everything up and taking it all to the pressing station then carrying it all back to the machine. Plus, I can sew my seam and press it right off instead of waiting and pressing everything at the end.
Once I got all the plates together and stitched to the block it was time to make circles. I found a round jar top that covered my holes neatly and drew circles on the wrong side of my fabric. I used iron-on interfacing, glue side toward the right side of my fabric and stitched right on the drawn line. I cut them out and made a little slit in the interfacing, and turned the fabric making sure it lay smooth and round.
These got ironed onto the centers on the plates.
Then again using the blanket stitch got secured. It's almost invisible but when you do see the sewing it is pretty stitches to see!
Now I have all 16 plates finished. It's quite a pile! I need to decide how I want to put them together.
I have the idea to sew a folded corner square to each inside corner, giving me an on point square when the blocks are sewn. This would eliminate the large area of blank white space between the plates. I just can't decide how large? Ideas? The white blocks themselves are 21 inches. Decision time. These cry out to be finished! I also need to go run that long arm again before I forget everything!
I have been on a bit of an adventure these past couple of weeks and maybe my next post will tell you about it? I think it's quite exciting and I am looking forward to sharing with you!
Thank you for visiting my blog today!
xox


All 16 blocks are finished - wow, you have just flown through these! The diagonal corner blocks to make the on-point squares sounds like a great idea. I think I'd test what it would look like with the straight edge (uh ... the diagonal) about 2 or 2 1/2 inches away from the closest Dresden point. A way to test for the right size might be to lay a bit of the blue fabric below four of the Dresden blocks and fingerfold the background fabric back. And then back up so you can actually see it, of course. (ugh, not sure if that makes anywhere near as much sense as it did in my head)
ReplyDeleteBeautiful work!!
So very pretty! It will be amazing when you have it all finished :)
ReplyDeleteI love the Dresden plate...looking forward to seeing how you finish this.
ReplyDeleteLove how all the blues look together. Pretty dresdens
ReplyDeleteThanks for sharing your process with your Dresdens. You have the perfect set up with everything at your fingertips and you are so right about getting a routine going makes it so much easier. Those blues are gorgeous. Can't wait to see this all together.
ReplyDeleteYour dresdens look fabulous! I like this technique with the pointy tips better than the "original" rounded edge, don't you?
ReplyDeleteAh, tie quilting I made tons of these in the 70's. Actually pleasantly surprisd that they are back!
ReplyDelete