Daffy's Stitchy Friends

Saturday, July 29, 2017

Let Me Call You Tweet Heart

Yesterday was such a good day! I baked banana bread ~ that means it wasn't too very hot to run the oven for an hour. I also completed a project on my new Singer 404! I knew this little bird wouldn't take long but, wow! I finished it in record time. Well, record time for the Queen of Slow Stitching, anyway!


Once I had the stitching finished, I put iron on interfacing on the back of both pieces. The interfacing will help keep the stuffing from poking through!


I sewed up the seam on my 404 and stuffed the pin pillow with lavender buds and crushed walnut shells. Smells so lovely! I put a rustic blanket stitch in green floss around the edge to soften the blunt look of the two different fabrics.


Oh, how adorable! Some would say, "Too pretty to stick pins in!" but NO! Use it! Love your smalls to pieces, literally. I'd much rather see my work in use, loved, and wearing out than sitting on a shelf, covered in dust. 


Design ~ Tweet Hearts, Exemplar #1
Designer ~ Blackbird Designs
Fabric ~ 32 count Daffycat-dyed  Jobelan
Fiber ~ DMC
Finish ~ Pin Pillow

My 404 sewed very well for me. I am loving this machine. I also really like having the bed level with the cabinet, as nothing hangs over the edge of the machine. I must be off find another project!


Thank you for visiting my blog today!
xox

Friday, July 28, 2017

A Little Birdie Told Me...

...it's time to sign up to join the Piggy Bank Challenge for 2018!


Well, it wasn't actually this little bird, that's my WIP! A pretty Blackbird Designs small. Quick and fun to stitch and finish.

The real little bird was Val at Val's Quilting Studio. The sign ups are open to linky your blog until August 1st. Last year I saved over $230. in my jar. I already have a start...


Maybe I can save even more this year! How much can you save? What would you spend it on? I think I might buy fabric with my savings. Lots of fabric. Ooodles of fabric!

Come, join us! Save your spare change for a year and spend it on your quilting or stitching passion. Click one of the links above (or on the right hand sidebar) to join up.

Thank you for visiting my blog today!
xox


Sunday, July 23, 2017

Hot Hot Hot

We are in a stretch of ridiculously hot weather, 100 + degrees but I am keeping inside in the air conditioning and of course, sewing! Today it's the New Moon and time to share our Totally Useless Stitch A Long ORTs! I don't have many since I spent most of the last month working on restoring the 301 but I sewed a little and have a few threads to share:


There aren't enough ORTs to cover the ink stains in my wooden leaf. Maybe I already told you this bowl sat by the telephone when I was a girl, filled with pens and pencils?

The leaf bowl is sitting atop some little postage stamp blocks I have been practicing with. Why do I need practice? Well...I spent my Piggy Bank Savings on this:


A Singer 404, already fully restored. He arrived on Friday and I wasted no time putting him in my cabinet.


Then I grabbed my box of two patches and started sewing! He runs like a top and sews a really lovely seam. The two patches are what I've been using as leader/enders for two years now.


Have I mentioned how much I love this cabinet? I even love the thousands of teeny scratches caused from a seamstress putting her scissors down over the years. I plan on adding to those!


Dash said he looks just exactly like my other two. What can I say? I adore Palomino colored Singers!


I am used to sewing on a modern machine. Fern always stops with her needle down and her foot controller is completely different. There is no computer controlling the 404! I need practice to learn how to stop this one with his needle in the fabric. Soon, I had a stack of my two patches sewn into 16 patches. All the while I am learning to control that needle!


I sewed the sixteen patches together. Would you call this a 64 patch? Whatever! It came out to 12.5 inches square. Perfect! There is no better way to practice than with a giant stack of two inch squares. The scary thing is I have not made a dent in that box of two patches...

=^..^=

Now it is YOUR turn...we want to see your ORTs! Leave a comment on this post with a link to your July TUSAL post so we can come visit! If I hold a Totally Useless giveaway your comment will earn you an extra entry.

Wondering what a TUSAL is and why all these people are posting pictures of rubbish? Click here to learn more and join the fun!


Thank you for visiting my blog today!
xox 

Saturday, July 15, 2017

Singer 301A Restoration

I have been watching Andy Tube avidly since buying my 2 vintage sewing machines. Andy teaches vintage sewing machines. This channel is a wealth of information for beginners like me and the way Andy teaches makes it easy for me to learn. I've been studying along his series on a Singer 404 and since most of the parts are similar I was able to follow and do the same on my Singer 301A.


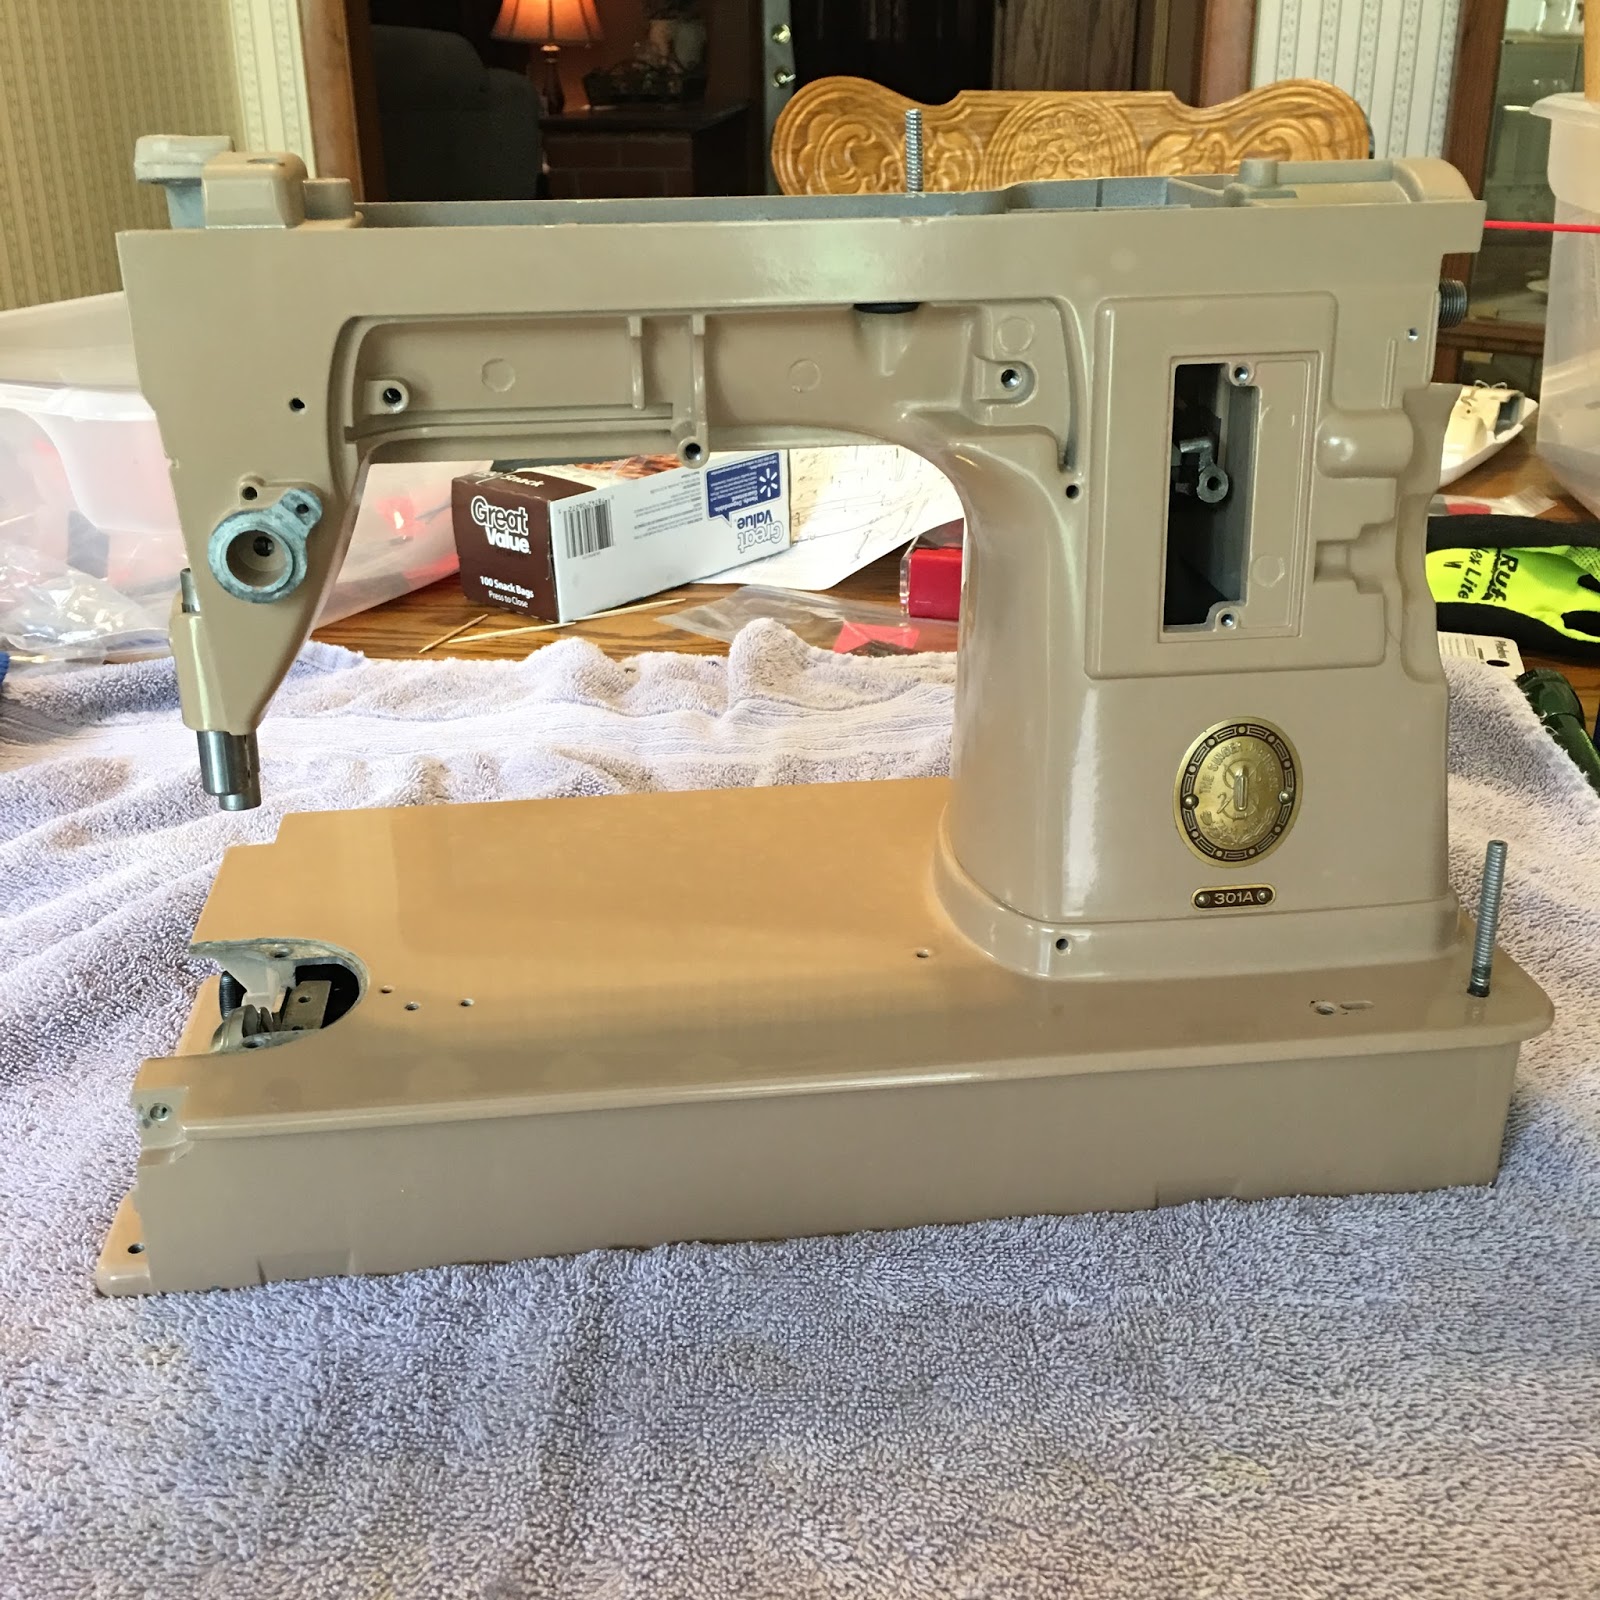
Here is my machine, ready to restore. It doesn't seem too bad does it? I had spent a few hours cleaning it after I purchased it. Just wait!


I start taking parts off. Mind you, this isn't willy nilly! Everything that comes off is labeled carefully so I don't get mixed up!


My box of parts started filling up fast. As I took things off they got thoroughly washed with a degreaser and rinsed in water (even the bottom cover with the felt) then carefully dried and buffed with a dremel tool and oiled/greased as needed. The painted parts got many coats of various waxes.


See how filthy and rusty this tension unit was?


There was lots of gunky grease, likely put on at the factory during assembly. This stuff sits and absorbs odors and is sticky beyond reason.


Some parts were the very dickens to remove. I HAD to remove this Needle Clamp to be able to remove the Needle Bar and it took forever! I even emailed Andy to make sure it actually came off and I wasn't trying to remove something that was all one piece. I soaked this in WD40, in degreaser, and in rust remover, and I wiggled until my fingers were sore. No movement. I finally took the hairdryer out, got the part hot and let it cool and it came right off! It was pretty rusty! 


Some parts were downright scary to remove! This is the Thread Take Up Lever. All this is what attaches to the Needle Bar and the Needle Bar Crank. THIS MAKES IT SEW AND I TOOK IT OFF!


Lots of grease flung about on the inside. The end of the motor comes up through that empty hole. Seriously, the light and motor were the easiest parts to take off!


Then there were parts like these that gave me quite a scare. First I had trouble removing the lever that attaches to this and panicked, emailed Andy then I figured it out and emailed again saying never mind. So then, I got to fiddling with the little slide block (tiny silver part in the middle) that is still in the machine and it fell off into the body! Oh holy crows! My heart literally stopped! Andy had not mentioned that it came off and I just about came unglued for a few minutes. Then I realised how easy this would be to get it all back together and had quite a laugh.

I also had to tell Andy about how I nearly died taking apart the Feed Regulator... 


I don't think this Handwheel has been off since 1956. So much varnished oil! Remember, I had spent hours cleaning this machine already!

Once everything I could take off was off, the machine got taken outside and sprayed inside and out with a degreaser, scrubbed with a toothbrush, rinsed off with a garden hose and got a blow-dry with a leaf blower! I am not kidding!


It came back inside looking like this. I quickly started oiling and greasing gears and doing basic rust prevention. 


Oh my, it is so clean!


I was astonished how clean it came. Remember all that grease and oil and dirt? Gone. Along with the stink!


Once everything was clean it was quick work to put it back together. Before I knew it it was done! Every part was sparkling clean. And best of all it sewed!


The machine looks incredible and best of all, between the waxes and the yummy oil (Tri-Flow smells of bananas) no longer smells like an old auto workshop. All the workings are oiled and the gears are greased. The finish is protected with the wax and my material should glide across the bed. 

This was the best adventure ever! I had so much fun restoring this machine! This will not be the last machine I will restore. I am planning to do my Rocketeer next and I am constantly searching for any others in my area I could be interested in. If you have read this far you might be as crazy as I am...

Thank you for visiting my blog today!
xox


Sunday, July 9, 2017

Piggy Bank Challenge

Val let me know last week it was time to cash in our savings for the Piggy Bank Challenge. We were supposed to post our results on the 6th, I think. Of course, I am late! I did send Dash off to the bank with my coin and he brought back this:


$233.93

Wow! Then I realized I was missing this:


The four Quarters I had taken out of my jar to help me measure my presser bar height on my 301. Whoops! So my actual total is:

$234.93

Not bad at all for spare change! I haven't decided what to buy. Fabric? Another vintage machine? Patterns? The choices...there are so many! 


I tossed my coins back into my jar to start saving again...

Please visit Val's blog to join in on the fun! Sign-ups start on 13 July. How much can you save to spend (guilt-free) on your hobby?

Thank you for visiting my blog today!
xox

Friday, June 23, 2017

Quick ORT Snap

Today is the New Moon and time for the Totally Useless Stitch A Long! My ORTs are cluttered atop EVERYTHING in my studio because pest control is coming to do their yearly business in our house. Miss Molly is at the vet's getting vaccinated and toenails trimmed (I don't like getting growled at. Or bitten.) and there she will stay until the house is dry. While waiting, I will post lovely blue ORTs:


And a total crapload of CLUTTER. The pink Post It note is to remind me the throat plate is for straight stitch only...don't switch to a zigzag! Our house looks crazy with stuff pulled away from the walls and stacked on top of tables. The OCD in me is screaming to get everything back in ORDER. 

=^..^=

Now it is YOUR turn...we want to see your ORTs! Leave a comment on this post with a link to your June TUSAL post so we can come visit! If I hold a Totally Useless giveaway your comment will earn you an extra entry.

Wondering what a TUSAL is and why all these people are posting pictures of rubbish? Click here to learn more and join the fun!


Thank you for visiting my blog today!
xox 

Saturday, June 17, 2017

A Little Upgrading

Sew, my studio has a new addition! I found this lovely Singer sewing cabinet on Craigslist yesterday. It came with an old 1970's plastic Singer inside but my 1960's Rocketeer will fit once I get the Rocketeer restored. I moved my particle board cabinet right on out!


Right now my Juki is sitting atop the cutout insert. When I want to use the vintage machine I can move the Juki and lift the 503A out of it's cave. The 301A takes a different mount as it was meant to be portable.


Look at all the storage space in the drawers! It is shorter than my old cabinet but I don't mind a bit!


Included in with the accessories for the 1970's machine was this Singer accessory box. 


I cleaned it all up and it fits my 503A cams and feet and plates like it was made for them.


I should really stay off Craigslist and eBay! There is a 401A nearby and it seems I am a sucker for beige and cream colored machines...

Thank you for visiting my blog today!
xox


Wednesday, June 14, 2017

Fun Mail Day!

I was excited for this afternoon's mail as I was expecting packages! I got home to find a huge box marked "perishable" all over every side. "What's this?" I asked Dash. He had no clue. Fun mail isn't supposed to look like that and I was deeply puzzled. Oh, wait...that's my prescription from the specialty pharmacy! Not fun mail at all! My little bottle of pills came in a giant styrofoam box with little chilled coolers inside another giant box. 

Then the actual mail came and I  was a little frightened:


Eeek! Obviously well smashed on top of being two days late. Hmmm. This package went from Arizona to Virginia where it wandered around before being sent back to Oklahoma for delivery. 


Whew, the insides were undamaged! I found this box of 503 accessories on eBay and snapped it up as I have no feet except a zigzag and I was hoping it had some of the cams I needed to complete my set. It did have two I needed but it also had two of the "0" (zero) cams that are rather sought after. That makes 3 zero cams I have! I will have to give these things a good cleaning ala Andy Tube's method as they are kinda stinky. The box will be put in storage along with the manual...pee-yew...I hate that musty odor!


Another little package, this one undamaged, was a bobbin tension meter so I can check things out on my machines. You can find this creature on The Singer Featherweight Shop's site click here.


I've also gathered even more supplies for machine restoration. Odd photo angle as my paint brushes package would not stop shining!


This is a picture for Andy who was telling me about the rare eyelet cam for my buttonholer and as luck would have it one was mixed in with the accessories that came with my 301. It even has the original box! Quite a find and I still grin every time I think of it!

No photos of the Dresden plate, but all my folded corners are on! Progress, slow but there.

Thank you for visiting my blog today!
xox

Sunday, June 11, 2017

Stuff & Thangs

Too much life and not enough sewing...I need more free time! Lots of what free time I do have has been spent watching the Andy Tube channel on YouTube. Andy teaches vintage sewing machines. I am learning so much about my machines and have been gathering supplies needed to take one apart and restore it. Andy is doing a series right now on a Singer 404, step by step, take it apart, clean it and put it back together. It is so interesting!


The other day I stopped by Walmart to get a French bread, ham and Swiss cheese to make sandwiches for dinner. Heading to checkout I passed by the fabric area and discovered it packed full of clearance fabric. I picked up an entire bolt of this navy blue print on white, perfect for the backing on the Dresden plate quilt! Best of all the fabric was $1.50 a yard so I got 8.5 yards for $12.75! I am not kidding! 


How is the Dresden plate coming along? Slowly. It would go faster if I actually sewed on it, right? I tried a few of the scrappy corners and I think I like the look so I am working on the rest of those today.


These blocks are so big! They seem to have taken over my studio. Big blocks will probably make for a lightening fast "putting together" when I get to it.


I need to come up with a border idea for this one. Suggestions?

Thank you for visiting my blog today!
xox