Daffy's Stitchy Friends

Showing posts with label Tutorial. Show all posts

Saturday, August 12, 2017

My Favorite Kitten

This design was serious fun! I couldn't even be bothered to stop and blog about starting it before I had it stitched and finished. Too much fun!


Design ~ My Favorite Kitten
Designer ~ Primitivebettys
Fabric ~ 32 count Belfast Linen, Daffycat Dyed
Fiber ~ DMC
Finish ~ Pinkeep

I had a few comments and questions about the Tweet Heart finish so I decided to address those in a similar finish blog post. First off, someone said something like, "You make it sound so easy!" which I worried meant, "This is easy for you to make but "I" could never do this." I want to make it clear this IS easy to make. YOU can do this! So I found a pattern I've had sitting and waiting and made a start, taking photos as I went along...


I have my design stitched. I don't really enjoy stitching on Belfast (it wrinkles like mad) but I wanted its rustic weave for this project. I cut out some iron-on interfacing to cover the back.


I choose a backing fabric and put the interfacing on it as well. Once you have it ironed on don't fiddle with it until it is cooled down. Let that glue set!


I take my pattern and hang it up in the window. 


I put my Kitten over the paper face down so I can draw on the interfacing. The tricky part is centering! Once you think you have it where it goes, tape it up and check it over carefully! Once you're sure, trace over the lines and don't forget to mark the opening you are to leave un-sewed!


I use a Frixion pen. This ink erases with heat. The line I have drawn is my seam line, the line I will sew directly on. If my pattern called for me to sew inside the line, I would draw a second line.


Now, I pin my backing fabric to my stitched piece. Careful! Make sure the pretty sides touch each other! 


Now, I sew on the line, careful to backstitch at the start and stop. What if you don't have a sewing machine? 1. You can hand sew, use tiny, secure stitches. 2. You can have a friend sew it on their machine. 3. You can invest in a machine of your own. Check Craigslist or Facebook marketplace for an inexpensive machine in working order. I am fond of vintage Singers as they are easy to find parts for.


Once my seam was sewn, I ran the hot iron over it to "disappear" the ink. See how the ears are still there? Just a touch of the iron erases the color.


Now, I can trim close to the seam and clip any curves so it will lay nice inside.


The hardest part ~ turning! Careful not to tear out your stitching. Be gentle. Poke. Pull. Squeeze.


I use a turning tool to help poke out ears and tails. A chopstick works great! Careful not to poke through the seam. I run the tool along every seam, pinching from the outside to make sure it gets pushed completely open.


Goodness, Belfast creases and crumples.


I iron the piece flat, smoothing out the seam inside with my tool. Open it all up neatly.


Using the turning opening fill your pinkeep with your favorite stuffing. I like ground walnut shells., just pour them in with a funnel. Someone wanted to know why I use them? Because they are heavy and they smell lovely. They give a good weight to your pillow. If your pillow gets damp they won't get sticky like rice or small peas/beans would. I also add a good pinch of dried lavender buds for additional scent.


You can buy the ground walnut shells at the pet shop, sold as bird or small animal litter.. I got about a five pound bag, if I remember correctly. It fit inside this cereal storage container. I have had this same package for several years. Once I had it as full as I could stuff it I used a ladder stitch to close the seam, using sewing thread. Learn this stitch! It is a nice invisible way to close seams. 


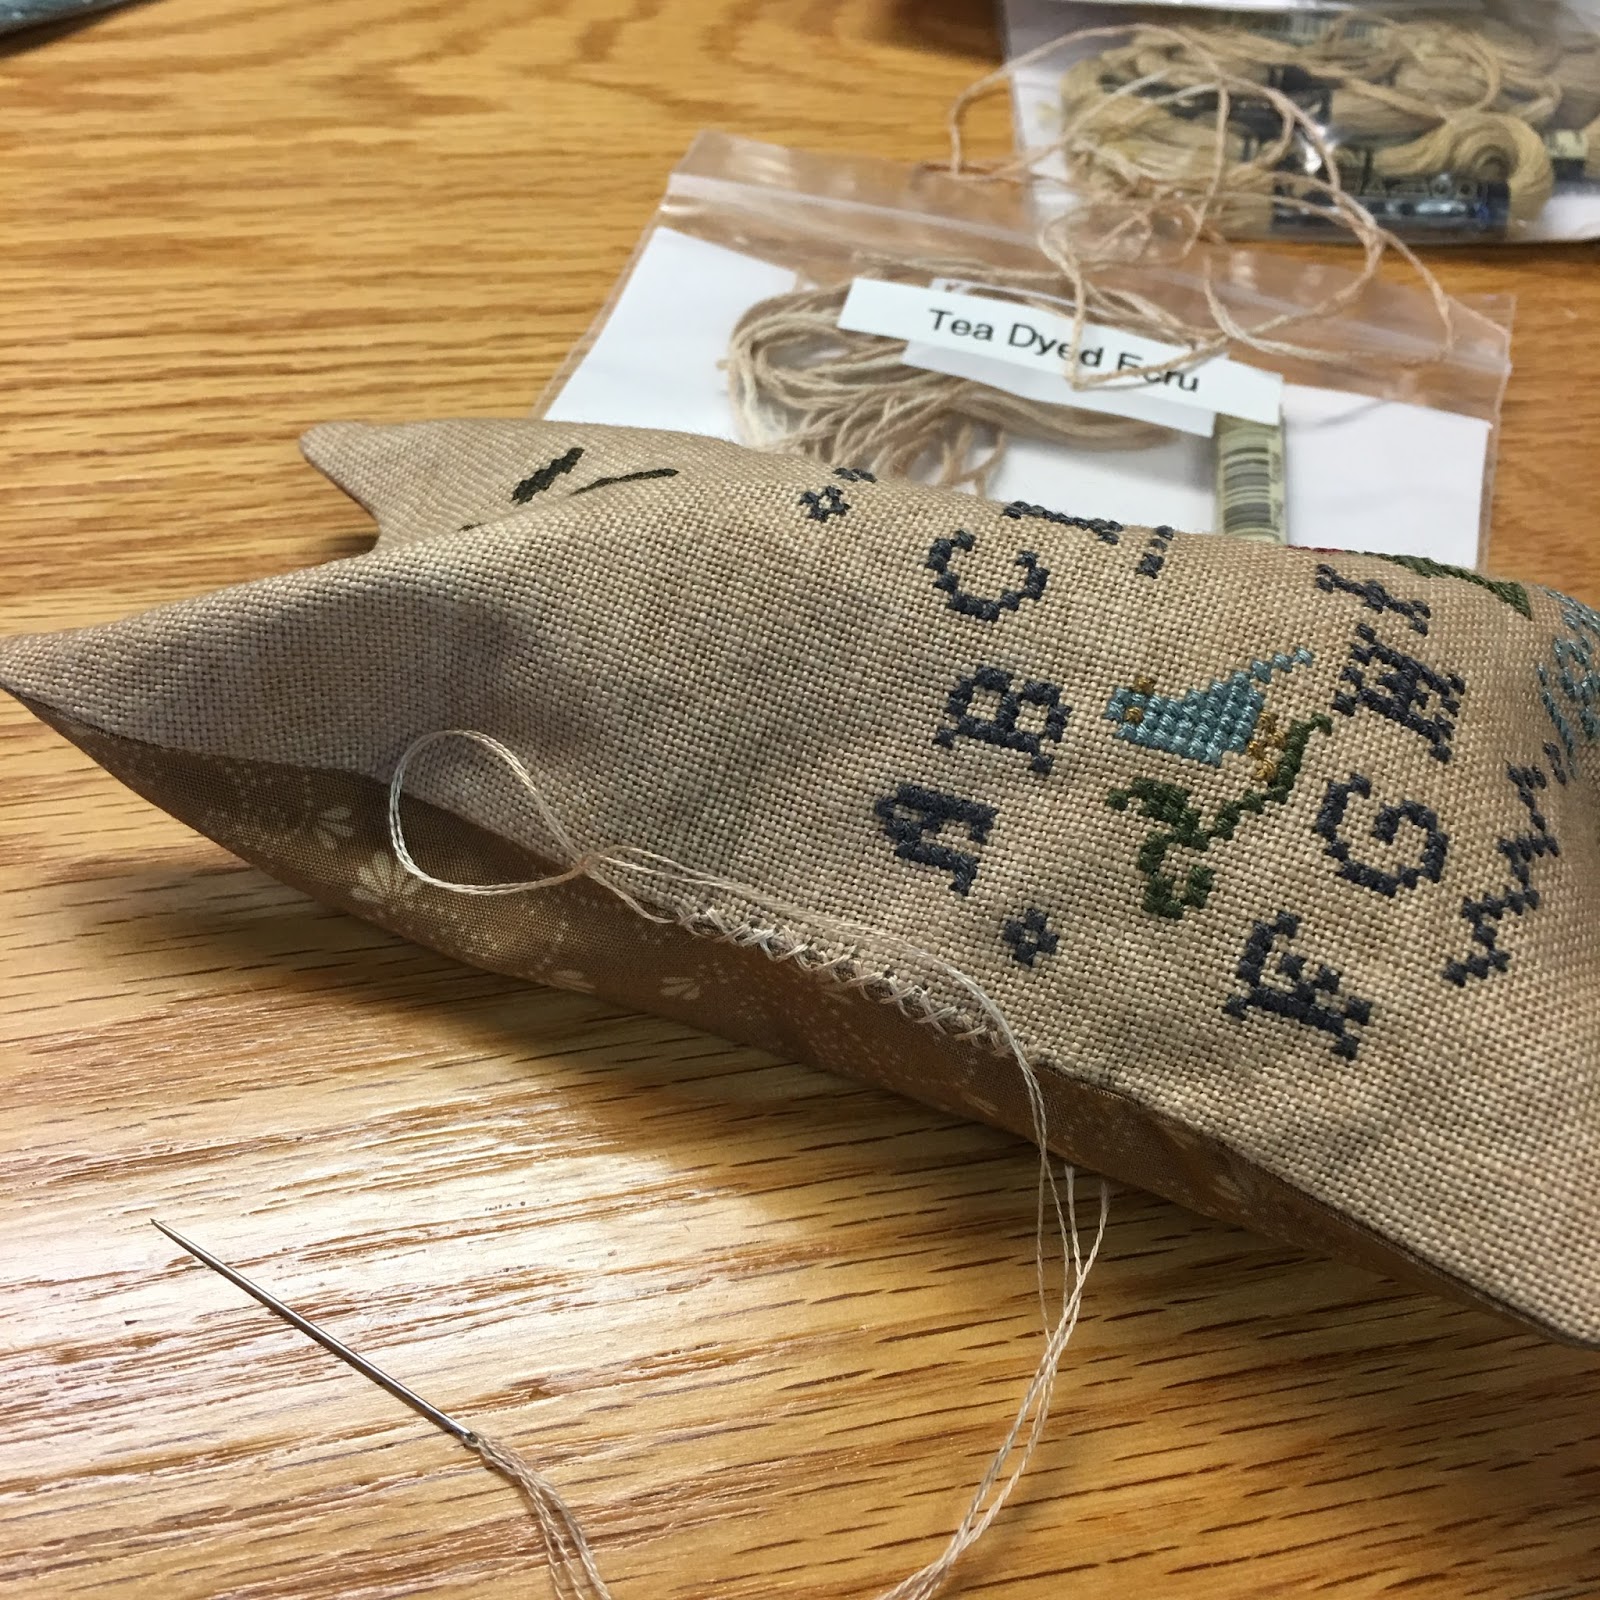
 Then I stitched a decorative cross stitch on the seam itself, using a DMC that I tea-dyed. I deliberately made it uneven to give it a rustic, prim feel. After my kitten was done, I used a hot iron to smooth the seam and to remove creases in the Belfast from all the pinching during sewing.


I think my kitten turned out really sweet! Don't forget, he isn't too pretty to stick pins in! Use your smalls and love them. Collecting dust isn't as much fun as being loved and used.

Thank you for visiting my blog today!
xox

Sunday, June 7, 2015

Sew A Crinkle Flying Disc Dog Toy

There were so many questions and emails after I posted about sewing Molly some dog toys I decided to do a tutorial to show exactly how they were made. These toys have become Molly's all-time favorite fetching object. My favorite too, as they are soft and don't tend to break stuff in the house when you've made a bad throw or the dog misses her catch. These are also machine wash and dry so when they get all dog-spitty and nasty - into the laundry they go. You should see how excited Molly gets when I take them out of the dryer...it's like brand-new toys!


Supplies needed:


2 pieces of fleece, a few inches larger than your desired finished circle.

A sheet of plastic, you can use the clear inner liner plastic of a boxed cereal or crackers but I've been using extra-thick drop cloth plastic because it holds up longer.

A piece of cotton batting.

Matching thread.

Basting spray.

Pins.

Scissors, use your craft scissors not your good fabric ones because you will be cutting plastic.

A dinner plate or some other round object.

A marker or pen.

Sewing machine.


Cover your work area before you spray! If you are taking pictures with your cell phone, cover your iPhone too. TRUST ME! Basting spray is nasty on your phone.

Layer 1 piece of the fleece pretty side down and give it a dusting of the basting spray. Put the plastic sheet on. Spray the plastic then stick the batting on. If you are worried about the basting spray harming your dog just wash the toy before use. If you are REALLY worried you can skip the spray and just use pins. I use the spray because the fleece and plastic is really slippery and the spray makes it so much easier to sew.


Now center the round object on the batting side and draw your circle.


Put your 2nd piece of fleece pretty side up and put the sandwich you made on top with the batting part up. Pin these together around the outside of your line. Don't trim yet! It's much easier to hold all the layers together while you sew the circle if you trim after it's sewn.


Now sew around the circle you drew leaving a 3-4 inch gap and backstitch at the start and stop. Don't worry how neat your sewing is, this is a DOG TOY after all!


Trim off the excess. I leave a good wide margin for extra strength. I have to put my scraps up up high since now Molly knows I'm making toys and she will fish the scraps out of the trash! I guess they smell the same.


Carefully turn it right side out, try not to stretch the fleece out of shape. Make sure you get it all smooth and flat(ish) around the edges. Fold the edges on the open seam inside, mimic the curve as best you can. Feel free to pin it closed. I don't pin, I'm making a DOG TOY so I'm not too worried...


Next, top stitch around the outside, close to the edge. This closes the gap you turned it through and makes it lie flat. Feel free to do some fancy quilting in the center. I never have time because someone is usually whining at me to hurry up...


Finished! It's all soft and floppy with that delicious crinkly sound dogs love.


You can give it to someone who will love it. Molly grabbed this one, gave it a furious shake and spit it right out for me to throw it.

Molly often naps beside me while I sew, but if I am sewing a tog toy she is sitting, watching, and waiting. I can't resist making these for Molly...she loves them so much.

Thank you for visiting my blog today!
xox

Thursday, July 19, 2012

Scanty TUSAL

My pitiful ORT jar for July's new moon. Too much life and not enough stitching time! Must get this sorted out before I have a breakdown! I'm just kidding, by the way!


Those TUSALers leaving a comment on this post to let me know you have posted your ORT jar will receive an extra entry in the giveaway, as usual. That hat is getting full, people! If you are new here and want to know what The Totally Useless Stitch A Long is all about click here.

For those asking about the counting pins I made in my last post...they are SO EASY! All you need are a few supplies...

Pins, buy the extra-long ones
Super Glue
Beads, any assortment you like
Toothpick, or you can use another pin


Put a drop or two of Super Glue onto a sheet of paper. You will use the toothpick to pick up some glue when you are ready. I use the little spacer beads on the top then a bigger bead then a tiny seed bead. Keep in mind you can use anything, in any order. Do what you like the looks of! Thread the beads onto the pin and see if you like the arrangement. If you like it, let the beads slide away from the top and use the toothpick to pick up a bit of glue and smear it around the top of the pin. Work fast, the glue dies quickly! Slide the beads up onto the glued area and I usually add a bit of glue around the bottom-most bead. I carefully poke the pin into a pinpillow until it's dried and I try not to touch it until the glue has a chance to cure.

Sometimes the beads come unstuck on my counting pins as I'm using them...easy enough to re-glue them as needed. Be careful with the glue...it's hard to stitch with glued-together fingers or pins & beads stuck to you.

Thank you for visiting my blog today!
xox

Saturday, December 17, 2011

How to fake a French Knot

This post is for Chris who is having fits with his French Knots. I've never had to do this myself. I am one of those that learned easily how to make a French knot and quickly perfected them but I know many, many stitchers have trouble with them. No one wants to wait to finish a project until the stitch has been learned reliably, and beads sometimes look out of place. I am not advocating using this technique forever. Practise! Learn those French Knots! But until you do ~ here is how to "fake" a French Knot:

I stitched a block of cross stitches for my foundation. Take two strands of floss and tie a simple pretzel knot and pull it snug. I left it loose in the photo so you could see the shape I used to form the knot. When you pull it snug (not tight) make sure you have all the threads pulled in, with no little loose loops.


Thread one end of your floss on the needle and go through the front where your French Knot is supposed to be. Remove the needle from the floss and just leave the tail hanging loose on the back.


Now, thread the other end of the floss on the other side of the knot and go through very near where your first thread went through. Try to split a fabric thread and go through that for stability. Pull that end to the back and flip the piece over. Be careful not to pop the knot through to the back side!


Tie both ends in another pretzel knot. Again, don't pull so tight you pop your knot though to the back! Tying the back ends will give the knot on the front the round shape you are looking for.


Then thread the ends on your needle again and secure them underneath stitches like you would to finish off any other stitch.


Can you tell which of these is a "real" French Knot and which is "fake"? No? The one in the middle is the real French Knot. Yes, this is troublesome and fiddly but it could get you through until you learn that stitch!

Thank you for visiting my blog today!
xox

Tuesday, November 29, 2011

Loose Stitch Fix

A how-to for new-ish stitchers.

It never fails you don't notice the loose stitch until well after the fact. The little buggers usually crop up after a tiny twist in the thread finally untwists (sometimes days later) and there you have it. A loose stitch. If you are OCD or working on perfecting your backsides now is the time to frog. Unpick the whole blasted thing to get to that ONE LOOSE STITCH! Or you can fudge it like this...

I stitched this block with one thread so you could see everything easier. And I exaggerated a loose stitch.


It's the perfect place to use the loop method start I showed you ~ just loop through a thread on the back side. I'm doing it with white so you can see. Secure the thread a little bit away from the loose one.


Find the loose thread, pull it to the back with the tip of your needle and go through it. Make sure to get the whole thread or threads! Pull snug.


Now, going a little bit away from where the loose stitch was, run the needle under the stitches to secure the thread and end as usual. The loop holds the loose stitch tight. It isn't pretty but it works.


It sure beats frogging.


Shhh! You can't even tell from the front! Just ~ nobody look at my backside. Please!

Thank you for visiting my blog today!
xox


Thursday, November 17, 2011

Beaded Ribbon Edging

The supplies for the beaded ribbon edging are easy: sewing thread, beading needle, ribbon, beads and your finished piece. You need a needle that will go through the small beads holes ~ check it! I use sewing thread because it is stronger than embroidery floss ~ don't want it to break! Also shown here is my Tacky BOB, a little sticky case you put the beads into and is very handy to keep beads from flinging everywhere if they get bumped. Wait, make that when they get bumped.


First measure and mark your bottom center and secure a knotted thread. I try to use a long enough thread to do the entire ornament but it is easy enough to start another if needed. You want to start just to the left of the center. Hint: if you slide your needle through the seam you can tuck the knot into the seam to hide it. Sometimes, this takes a little poking of the knot with the blunt end of the needle. Don't secure the thread to the needle, if you make a mistake you need to be able to take the needle off and "stitch" backwards!


I use ribbon right off the roll since I won't know how much it's going to take. Choose a place on the ribbon to start, leave a long tail. Come out of the ribbon, go though a bead and go back into the ribbon on the same side ~ don't loop over the ribbons edge. Here is where you will make the mistakes and need to reverse ~ by looping the edge. I do it at least three freakin' times and have to back up!


Now, slide the needle through the seam the next bead spot. Randomly, please! We want this to be carefree! I usually give a little knot in the seam between the beads so if the thread breaks fewer beads will scatter.


See how I'm going through the seam? This is much like the ladder stitch (in the video on my last tutorial) except instead of joining two seams you are joining a seam and a ribbon, hiding the thread inside the seam.


I loop the ribbon. I twist the ribbon. I made wide hops. I make short hops. Can I emphasize random?


When you get to the top, measure and mark the center. If it isn't centered it won't hang straight on the tree. I leave a nice loop for hanging. You could also sew a hanging loop into the seam when you are sewing the pillow together, in that case you'd skip this part. I keep meaning to try that but I always get the darn thing sewn together before I remember!


See how I've made my hanging loop? Continue your random beading.


At the bottom place your last bead just to the right of center and tie a knot in the two ribbon ends. I leave these as a tail at the bottom but there is no reason you couldn't fold both ribbon ends underneath a bead and leave no tail.


I have a finished ornament! This one was so much fun to create, especially getting to show it to you step by step!

Thank you for visiting my blog today!
xox